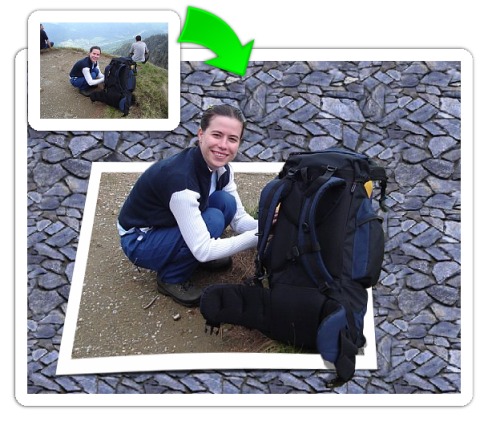
GIMP trick: make your subject pop out of a photo
I found an easy and nice Photoshop trick, so easy that anyone can do it with a bit of patience, it was hard to resist and not adapt it for the GIMP.
I made a detailed description of the process with screenshots for every step.
Here is a teaser:

See my page for the full presentation.
As the week-end is coming, see this as a challenge to produce your own works, put on the blogs and amaze people with your GIMP wizardry :p
And maybe post in the comments some links to your work.
Many thanks to my friends for motivating me to write this.


Wao!
ReplyDelete--
http://makuchaku.info/blog
i love it nicu,
ReplyDeletegreat tutorial...
thanks for sharing.
This comment has been removed by the author.
ReplyDeletehere is my 5 minute attempt...
ReplyDeletehttp://i9.photobucket.com/albums/a90/ryanlerch/gimp/sheep.jpg
eee! that is so cool; I've never actually used the iwarp filter before, very neat!
ReplyDeleteWhat's with the ugly chick
ReplyDeletehey anonymous, the beauty is in the eye of the beholder...
ReplyDeleteThese comments have been invaluable to me as is this whole site. I thank you for your comment.
ReplyDeleteGreat stuff! The only thing holding me back from becoming a total Linux user is the fact that I can do so much with Paint Shop Pro. If I could learn to do it all with GIMP that'd be so cool! Thanks for the little tutorial... it was great!
ReplyDeleteA long time ago I used to be a PaintShopPro user too, but those were the days of GIMP 1.x, which really sucked as a GUI...
ReplyDeleteBut in the meantime the 2.x releases improved the interface a lot, and by using the program I became accustomed with it and it grew on me.
Thanks for sharing. Going on a hike like that is a watershed experience well worth the effort to "enshrine" the moment. My next PC is going to be running Linux. With tools like Gimp and Open Office, who needs to throw hard earned money at adobe and microsoft? Better to spend the money on a good pair of hiking boots, eh?
ReplyDeleteHiking boots, a better digital camera, maybe a nice monitor for your PC, whatever... But yes, GIMP is a very capable tool and is a shame people don't know its abilities and go to pricier alternatives just out of ignorance.
ReplyDeleteThanks Nicu! Here's my first experiment!
ReplyDeleteVery nice, matt!
ReplyDeleteNicu, Thank you!! This will be useful to me and you explained it so well!!
ReplyDeleteThank you, thank you!!!
Many and many thanksssssssssss
ReplyDeleteThis is great! I'm playing around at work right now, but I can't wait to get home and try it.
ReplyDeleteOh cmon its not that great
ReplyDeleteThis is the simplest tutorial I ever seen.Thanks for sharing.
ReplyDeleteInkscape is also a good alternative to the Process you have set forth. I commonly use the two (Inkscape and Gimp) in tandem. Inkscape gives me a little more control by using a Bezier Tool. However, I must admit, I'm more of an Inkscape User than a Gimp User, so I imagine there are several tools within Gimp that I haven't tried.
ReplyDeleteKudos to you for the excellant tut though.
Happy Gimping
actually i am also a huge inkscape fan and have a few tutorials with both those tools combined
ReplyDeleteI could not even figure out how to add the two layers. Beginner, didn't get it. Trying to learn so I can add and create neat features to the photographs. I am just not getting it.
ReplyDelete@Anonymous: either use the menu, Layer > New Layer or the icon in the Layers dialog
ReplyDelete